Civilian Marksmanship Program Advanced Maintenance Course
(CMP AMC)
After Action Report.
My son Travis and I attended the CMP M1 Garand AMC the first of October and had a most OUTSTANDING! experience.
We both recommend this course to anyone that has an interest in these historic rifles.
We started this adventure back in November 2018 when I entered us in the lottery for a buddy class.
We were extremely lucky to have been drawn for the October course.
Nearly a year later it was time to go!
Our trip would include the AMC course, visiting family in Huntsville, and a bonus, meeting Mr. John Beard and his most lovely wife! We were blessed to spend an afternoon and evening with them. Travis and I learned a lot about WW1 era bolt action firearms from Mr. Beard which came in quite handy during our time in Alabama.
Those of you that read the CMP forum will recognize Mr. Beard as THE expert on WW1 era bolt action rifles. He is a volunteer Armorer for the CMP inspecting the bolt rifles before they are sold in the CMP stores.
We also visited the South Store and the CMP Talladega Range Store several times, our bank accounts suffered accordingly. More about that after the AMC AAR.
Ok, on with the AMC...
Day 1
We started out early morning of the first day with the welcome and introductions of the primary instructors, the students, course schedule, the objectives of the course, firearms safety, and a welcome by Mr. Mark Johnson the COO of the CMP. Very informative!As the introductions were happening we could not miss a couple of the instructors putting out about 80 SA M1 receivers and bolts on a couple tables.
The formal instruction stared out with an old but great Army M1 instructional video. Then it was on to a tour of the provided tool box and the tools that we would be using during the course.
(It was hard not to keep looking at the two tables with the receivers and bolts.)

Next we learned about how to inspect M1 receivers, the design, function, safety features, wear points, field repairs, and historic alterations.
Then it was time to pick out our receiver and bolt that would start the amazing journey of building our M1s.
We had a choice of $850 or $1050 receivers. There was little difference between the two. The $850 receivers supposedly had more pitting. (There was not much difference between the two that I could tell).
Ready, Set, Go!

There was not a big rush to the tables as there were 20 students and about 80 receivers and bolts to choose from.

The receivers had SN starting with six digits through 4-5M.
One six digit was in the 100k range.
All the receivers and bolts had been bead blasted and re-parked as were all the major components.
I would recommend that anyone taking this course have an idea what direction they want to go with their rifle build.
Low SN, high SN, try to get correct receiver / component dates, etc.
Travis decided that he wanted to try to get a major component from each manufacture as a tribute to the rifle he was building. He started with a six digit receiver.
I, on the other hand, had no idea and no plan at all so I started with a nice six digit that has deep and clear receiver markings, (as did Travis's).
What? WRA pre-WW2 and WW2 bolts? Yup, there were several! Now seeing that we have a couple WRA M1s pre and WW2 maybe a WRA bolt would be a good idea...
Travis in his quest for the ultimate tribute M1 also picked up a WRA bolt.

A few more parts were placed on our work area.

From here on out we would have a power point presentation with an explanation of what we were going to do then most times followed up with short video performing the task.
I'm going to make a comment about the AMC power point presentations:
It is my opinion that power point has been the death of good instruction. Seems now days with power point many people using it have become somewhat lazy ineffective instructors. Most time "presenters" just read what is on the screen. Waste of my time as I can read the information myself and that would save me hours of having someone read to me.
The AMC is not that!
The instructors used power point exactly right. They used it to highlight important points and presented the material way beyond what was on the screen. The combination of the power point, lecture, and video was spot on.
Our first task was to lap our bolts to our receivers.


Next, after a catered lunch, we went on a tour of the warehouse facility and in-house museum display. (The class is in the gunsmith shop that is part of the warehouse).
(No photos allowed)
Our warehouse tour was led by Lloyd. Lloyd has, IMO, the best CMP job. He inspects the rifles that come into the warehouse.
We saw some amazing historical M1s, Krags, M1903s, A3s, M1917, etc.
An amazing sight was the hundreds of crates containing about 60K Philippine return M1s! Would I ever like to look in those crates!
After our tour was the power point lecture and video on timing the barrel to the receiver.
Then it was our turn to perform the task.
Throughout the build the AMC gunsmith / instructors were there watching, answering questions, offering advice, and ensuring we were getting it right.
After we hand tightened our new Criterion barrels on to the receivers, it was into the barrel vices, and with just the right amount of tightening, a little at a time, we had our barrels timed.
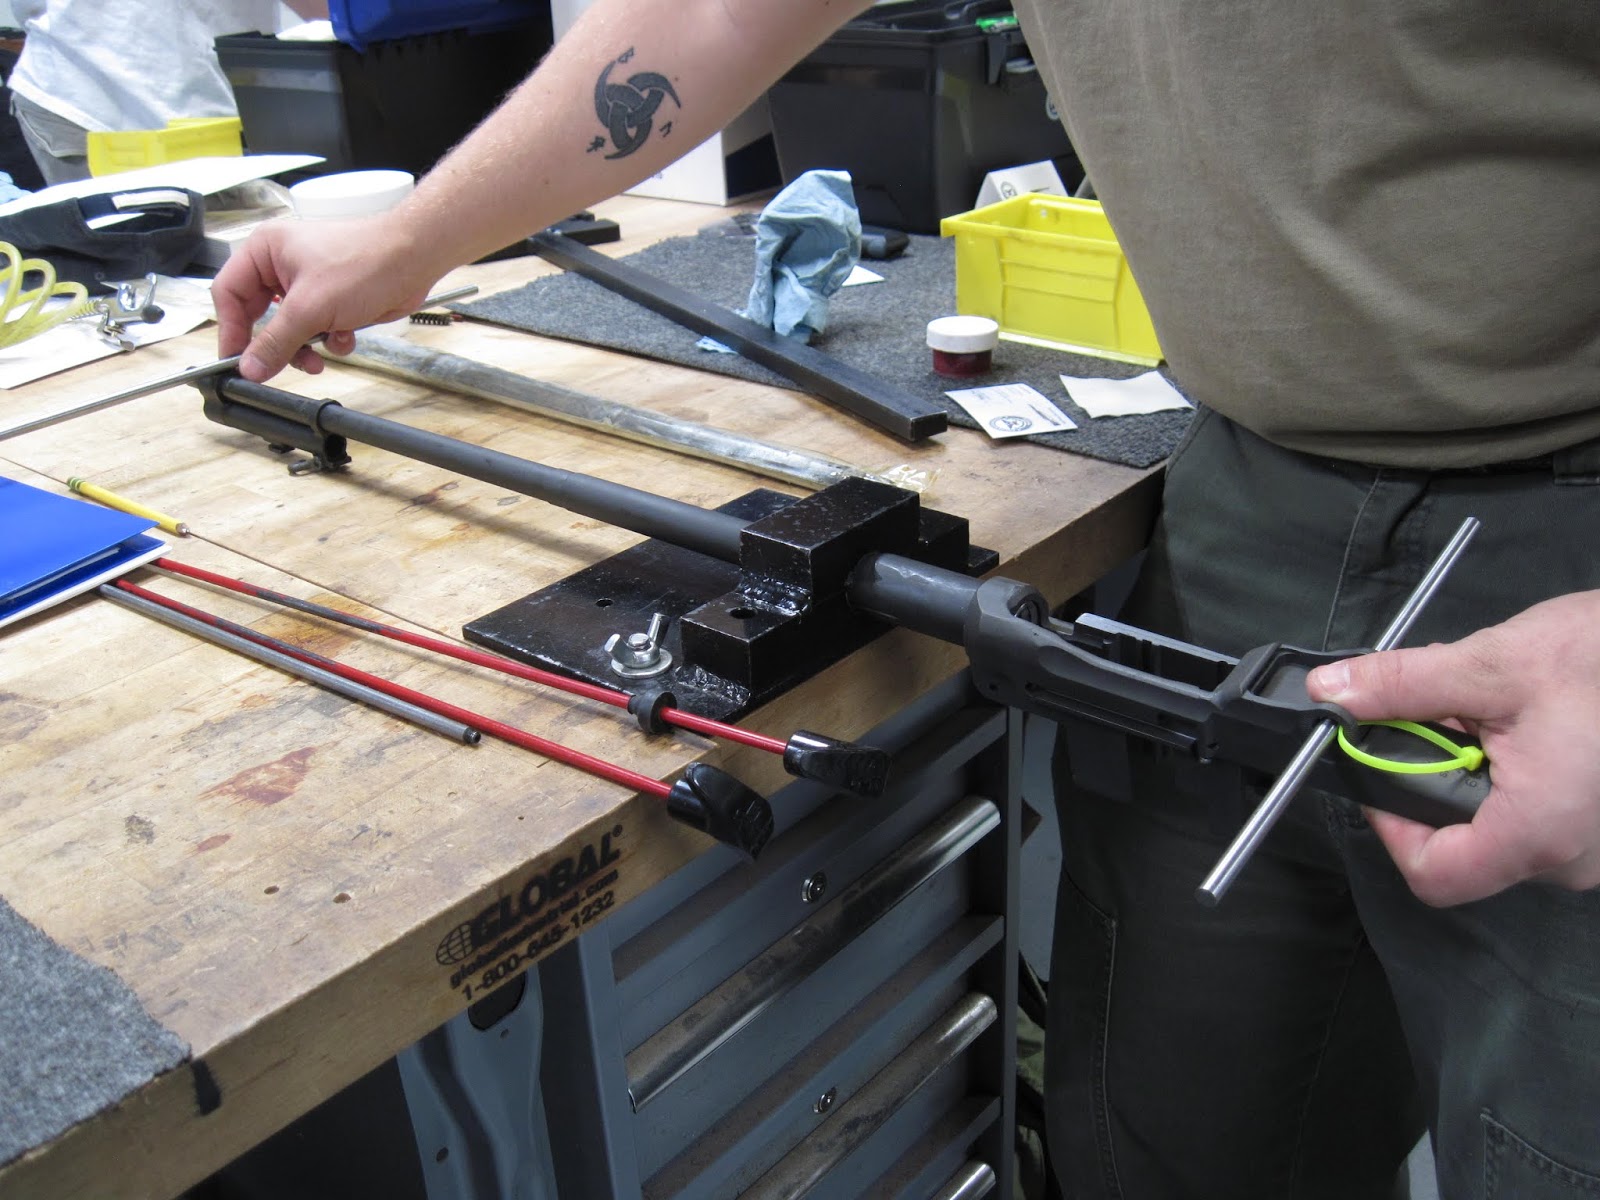


Barrel and receiver timed near perfect.

The instructors spent considerable time explaining the importance of proper headspace. It is a safety issue. Firing a M1 without the correct headspace can truly ruin you day.
After the headspace, using the go, no-go gauges, reaming the chamber to obtain the proper headspace lectures and demo videos, it was on to reaming our chambers to obtain the proper headspace.


Yup, starting to look like a M1!

After a review of the days instruction and a preview of the next day's activities we were dismissed.
What an amazing first day!
A note about the shop manual in the above photo: Everyone attending the course gets one to take home! No need to take notes with this book.
Sometime, during the first two days of the course, we visited the CMP armory, (for some reason I can't recall which day it was).
It was a great tour of the armorers work stations. We saw them inspecting, repairing, replacing parts, etc on M1s prior to them being put in the CMP stores and mail order. We spent quit a while talking with the Armors. It was extremely educational. We also saw several M1903s, M1903A3s, and M1917s that were returns from Veteran Organizations and soon to be in the South Store, the North Store, and the TMP Store. (Travis and I would see a M1903 and M1917 up close and personal later on...)
We saw, and held, two M1 Philippine returns that were 100% original, correct, and un-issued. They looked like the day they left the factory.
The armory tour was awesome.
Day 2
Day two started off with the class meeting at the CMP South Store for a one and a half hour visit to meet some of the store staff and armorers, and of course to inspect and purchase rifles. In addition to the M1s there were quite a few M1903s.
A few rifles were sold to the course participants. Many bought M1 tools and assorted accessories.
Day two instruction started with a lecture, video, and discussion about M1 barrels to include how barrels are made, barrel threads and importance, blank firing adapters, barrel wear and gauging, and required tools and procedures for gauging.
New parts were added to our parts bins.

Installing the clip latch.

Next it was onto M1 bolt assembly lecture and video. How to inspect the bolt and components, and how to properly use the bolt assembly tool. Then we assembled our bolts.

Next we assembled the internal magazine components.
(You will notice that I'm not mentioning the lecture, video, etc that preceded every section of the build)


Trigger group Component ID and inspection points.
At this point we selected our trigger housing from the tables. There was at least 60 trigger housings from all manufactures available.
Starting with the trigger housing we assembled the trigger components from every spring and individual part up.
We also did trigger group function tests to include testing the safety.


Lunch break! The lunches were catered, (pizza the first day and subs the next), after we got our food we returned to the classroom and there was a presentation while we ate. Also time for Q&A.
Next lecture, video, etc was IMO the most important safety section: Design of hammer, hammer / bolt interaction, out of battery firing, how to ID an unsafe hammer, etc.
On to rear sight parts and ID, different types of rear sights, assembly / disassembly, proper sight set up.


Lower band installation.

Gas cylinder design, function, and gauging.
It was at about this point, for some unknown reason, both Travis and I did not take as many photos.
From the tables we picked our op rods. Thanks to Travis's keen eyes and quick action I scored a slant WRA op rod!
Travis completed his every manufacture theme with a IHC op rod.
Next was M1 Garand lubrication, timing checks and correction, op rod spring inspection and gauging, assembly of op rod / spring .
Day two ended with hand guard and butt stock fitment and installation, final front sight installation, a review of the days activities, and what we would be doing on day three.
Also during day two we completed the necessary CMP paperwork and background check, and of course payment, to take possession of our soon to be completed M1 Garands!


Day 3
We were supposed to start day three at the CMP Talladega Marksmanship Park, (TMP), but due to a scheduling conflict we met at the same classroom.
We started the morning with a M1 accurizing presentation on how to make your M1 a phenomenal shooter.
We then did a trigger clean-up where using a small stone we lightened the trigger pull, (no less than 4.5lbs), and removed the creep from our triggers.
After a range use and safety briefing for the TMP we received our CMP AMC certificates and an awesome CMP AMC tee shirt.

After a lunch break, which Travis and I spent at the South Store checking out the M1s and 1903s. (No M1917s...yet). We then headed to the TMP 100 yard range for the final activity of the course.
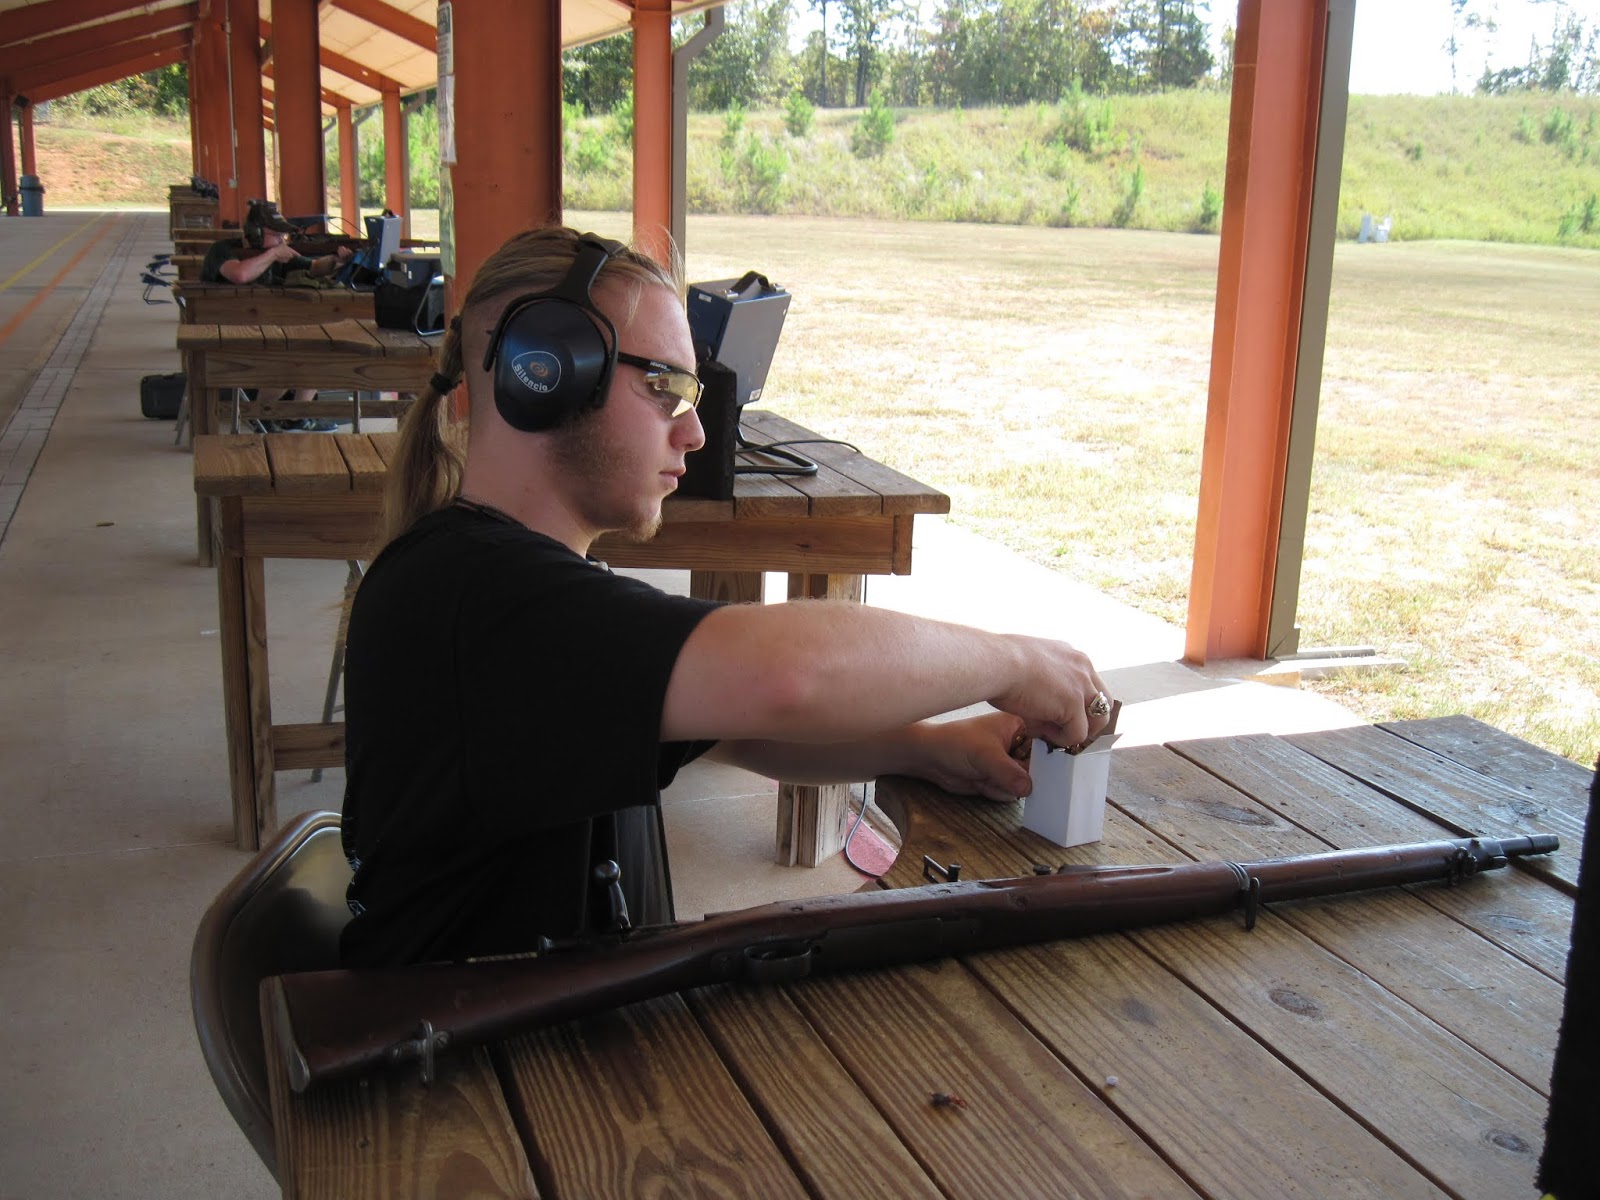
Firing our newly built most AWESOME M1 Garands!


The instructors / gunsmiths had to test fire the rifles first in case of some unpleasant malfunction. (Guess they are expendable?).

Not bad for the first eight rounds out of a virtually brand new rifle.

The TMP electronic targets are amazing!
PING!
My first eight rounds.

Travis's rifle test fire. Yup instructor still in one piece.

Travis firing his first eight rounds!

After another 48 rounds through each rifle it was time to case them up so that they could be shipped FedEx home to Alaska.
We then beat feet back to the South Store...
Because!
(This is the next day at the TMP)


Yup, we managed to score a couple most excellent 1917s, an awesome 1903, and a 1903A3 that looked like it just came from the factory.
Travis also found a most excellent 1898 Krag in near perfect condition all correct with a correct bayonet at a gun show in Huntsville.
Some thoughts about the CMP AMC.
DO IT!
If you have an interest in the M1 Garand it is well worth the cost of the course to learn about and build one of these historic rifles!
Travis and I had the most AMAZING time.
We met some of the finest folks you will ever meet.
We would like to thank the CMP staff, the CMP SS, and TMP range and store staffs.
The AMC instructor / gunsmiths:
Chris Hurd, Chris Knott, Luke Tyus, and Brent Marrow.
The Armorers and staff that we met at the SS:
Ellyn, Austen, Ben, Taska, Colby, Jeff, Matt, and a special shout out to Bobby, (also the many other staff members that I don't recall by name), all are outstanding representatives of the CMP and the South Store. (I am truly sorry that I do not recall all their names). Everyone was patient with Travis and me, our dozens of questions, and help inspecting our recent treasures. True Southern Hospitality!
We also had a short and most excellent visit with Sandy and Jennifer at the armory. Thank you ladies!
Mr. Mark Johnson:
Thank you sir, you have an amazing and dedicated staff and run an excellent organization!
A special thank you to Tom, (AKA PH68), and Charlie Brown for helping Travis and me with our many M1 and bolt action questions and with selecting the fantastic M1903, M1917s and M1s that Travis and I purchased from the South Store.


